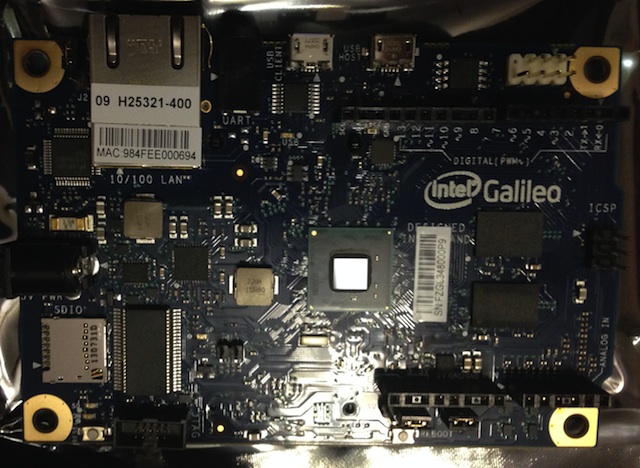
 Getting GT.M to work on the Galileo wasn’t really a question in my mind: the Galileo is an x86 processor with an i586 instruction set. There is no reason it couldn’t be done, but there were some bumps in the road.
Yocto Linux
I got introduced to Yocto Linux for the first time. Yocto Linux is a distribution designed for embedded systems, like the Galileo. Intel provides build files for the Galileo so that you can re-build Linux for the device. The micro distribution won’t be of much use as there really isn’t much there – I remember when having something more than 1.44 MB would be so much nicer for booting Linux. How things change /nostalgia. The cool thing is that the firmware is configured to look at the sd card for a grub.conf file, so you can put a more fully-featured Linux distro on a micro sd card. I followed some directions that I found on the internet that will create a more fully-featured Linux environment.
The wait
I found out that I couldn’t just compile the kernel as expected, but the entire distribution from source. This took hours. I initially started off with a 512MB 1CPU VM running on my MacBook Pro and got some memory allocation errors. I upped the memory to 2GiB, but still got memory allocation errors. I tried again with 4GiB: no more memory allocation errors, but it was taking a long time (it didn’t help that I was trying to use my machine for other tasks). It then ran out of space – I only allocated a 40GiB HDD and VirtualBox wouldn’t let me shutdown or login to the VM, so I had to start again. This time, I used 4GiB RAM, 3 CPU cores, and a 60GiB HDD. I left this running over night, and it finally compiled an image.
What? Why didn’t it boot off the SD card?
Excited, I quickly copied the files to my 16GB SD card and booted the Galileo to finally have a *real* Linux environment, but it didn’t start ssh as it should have, so I used the Arduino software to start a telnet session and, sure enough, it didn’t boot the new image. I could see the SD card, though, and the files were there. What was wrong?
File paths are important
In my excitement to copy files to the SD card, I missed that the grub.conf file needed to be in the following path: boot/grub/grub.conf. I fixed this and tried again.
Success!! GT.M on an Intel Galileo!!!
After a couple of minutes busily typing “ssh root@192.168.2.2” and getting “access denied” messages, I was finally able to get a Linux prompt.
GT.M
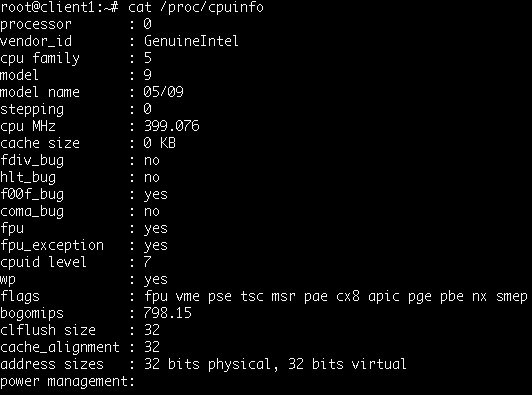
Looking at the SourceForge site for GT.M, it seemed to indicate that the GT.M binary was compiled for an i686. Well, that causes a problem – the Galileo is an i586 processor. After talking with K.S. Bhaskar at FIS during the 28th VCM, I found out that this should be a simple matter of setting the C compiler flags to target an i586 instead of an i686. This is an important item since there is some assembly code in GT.M and having to do those modifications would probably stop me in my tracks.
Compilation part II
![]()
So I’m off to do some more compilation. I’m hoping that this will take less time. I would like to thank K.S. Bhaskar, the FIS team, and the Kitware OSEHRA team for changing the GT.M build system to cmake. This made compiling GT.M a breeze. All I had to do was go to the advanced menu to set the “CMAKE_C_FLAGS” to “-march=i586”, configure, generate, make, make install, and tar up the “install folder” so I could move it to the Galileo.
Success #2
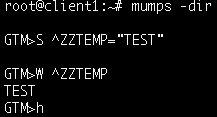
GT.M on an Intel Galileo runs! I used the default “gtmprofile” to get started (not recommended for VistA). I did some simple Set(s) and Write(s) to verify that the database did indeed work.
Live Demo
I demoed this during my presentation at the 28th VCM and it was well accepted by the community, because now we can see the light of being able to simulate running a whole hospital on a computer roughly the size of a deck of cards.
During the Live Demo, Sam Habiel asked if I could install FileMan 22.2. So, taking my life in my hands, I installed it on the fly! FileMan works with no modification and several commands were used as a test. Thankfully, there were no live demo problems.
Have fun hacking on the Galileo with GT.M!
NOTE: you may have to download the arduino tools and update the firmware of your Galileo before you can use the image below (Thanks Bhaskar!)
Downloads
IntelGalileoGTM.7z (live demo image)
All of the software is open source and redistributed under the respective licenses.